Cheat Device History and Lessons Learned
Note: This article was originally titled “Cheat Device Post-Mortem”, but since Cheat Device is still in development, I changed the title to “Cheat Device History and Lessons Learned”. Cheat Device is not dead!
tl;dr: I created a cheat device for PlayStation 2 similar to CodeBreaker, GameShark, and Action Replay. In this post I share my motivations and experiences while developing it.
Origins
Video game enhancers (or cheat devices) on 5th and 6th generation consoles have primarily existed as commercial products developed using reverse-engineered SDKs. In the case of ones created for the PlayStation 2, they even figured out how to press discs that can load on retail consoles without any modifications (!) or additional trickery. One of those cheat devices, and the one that is arguably the most popular among console modders due to its simplicity, is CodeBreaker. Published by Pelican Accessories (now Performance Designed Products), it offers straightforward cheat support for encrypted and unencrypted cheat codes, a large built-in cheat database, a save manager, and the ability to upgrade the cheat database using a flash drive.
Unfortunately, this feature suffers from a major flaw stemming from being developed with a reverse engineered SDK: it doesn’t work on slim-line PS2 models, leaving out a pretty large amount of consoles. Realizing this issue, in addition to others, I set out to create a new open source game enhancer using a newer SDK.
My main objectives were to:
- Create a game enhancer similar to CodeBreaker but with improved usability and compatibility.
- Allow for fast loading of large cheat lists.
- Allow for editing and saving of the cheat database on-console.
- Develop with the constraints of the system in mind: 32MB RAM and a slow USB 1.1 interface.
PS2RD GUI

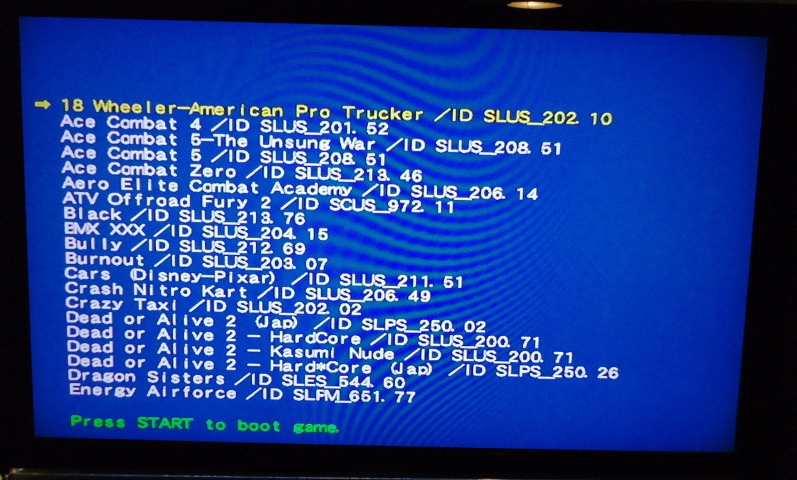
PS2RD (PlayStation 2 Remote Debugger) is a mature homebrew utility created by Mathias Lafeldt that can be used to enable cheats in retail PS2 games, among other cool features. It had a very simple text-based UI, so I decided to take a stab and create a new GUI similar to CodeBreaker.
This was my first “large” software product created on my own, and I didn’t really know what I was doing (I learned a lot though, and that’s what counts). It used PS2RD as a base and displayed a simple menu to select cheats and boot games. It was pretty ugly, with a simple blue background and text rendered with a mono-spaced font, but it was functional. Despite this, I remember someone on PSX-Scene defaced it and added a credits screen taking credit for the GUI. I guess someone liked it enough?
Eventually I ran into issues that would require a fairly substantial rewrite to overcome, including:
- Loading cheat lists was _very_ slow, as each game, cheat, and code struct was allocated from the heap separately.
- I dug myself into a hole by creating a messy, poorly thought out menu system primarily residing in a single source file. Remember, I learned a lot during the course of this project!
After realizing the issues at hand, I took it upon myself to create a new project from scratch: Cheat Device.
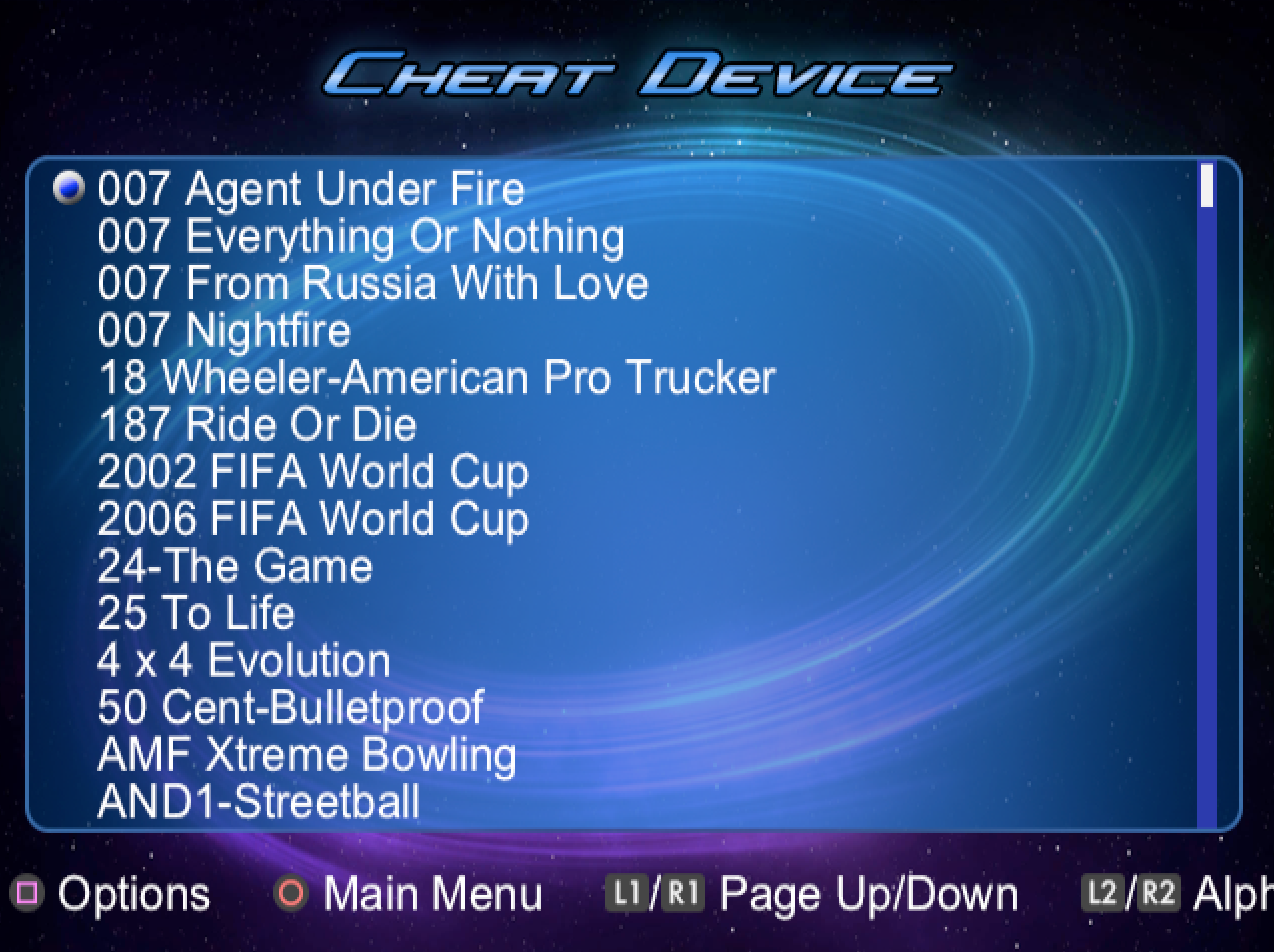
Cheat Device
Cheat Device is a clearer realization of my goals for a game enhancer and was developed on a clean slate. Rather than building a menu within the existing PS2RD code base, I created a new project that included PS2RD’s code engine as a separate module.

Custom File Format: Cheat Database (CDB)
Quickly loading large cheat lists was the first goal I wanted to accomplish. PS2RD allocated structs one-by-one, so I decided to create a new binary file format that included fields for the number of games, cheats, and codes allowing each structure to be allocated at once rather than calling malloc thousands of times. To speed things up even more, the database was compressed using zlib to make up for the system’s slow USB 1.1 transfer speeds.
I admitedly didn’t think through the format very well. The format was designed to place all the game titles in a single chunk, followed by all the cheats in another chunk. Entries in the game chunk included an absolute offset to the start of the game’s cheats in cheat chunk, which required some trickery to get correct while generating the file. I was originally indending to load only the game titles and cheat offsets to create the game menu, then load the cheats “on demand” to create the cheat menu. Ultimately I decided to load the games and cheats at the same time all at once, as it ended up being much simpler.
I can sumerise the main issues with the format as follows:
- I was overestimating the constraints of having “only” 32MB ram (which is actually plenty for what it’s being used for here) and tried to optimize for the wrong reasons.
- I mistakenly thought If I placed the game title strings closer togther, it would compress better and the overall file size would be smaller. I later discovered that zipping a text file of cheat codes actually yielded an even smaller file size!
- The final file is a raw zlib stream without any headers! This makes it difficult to determine if it’s a valid file or not without relying on decompress2() to fail if something is wrong.
Responding to User Feedback
I eventually realeased the first version in early 2015. It was mentioned on some homebrew scene sites such as psx-scene.com, eurasia.nu, GameHacking.org, and a few others. People seemed to like the interface and simplicity of being able to load games from disk or an ELF file.
One of the main requests from users was for a more simple method of creating cheat databases. At the time, Cheat Device required using a seperate program (cdb-util) to create the cheat database file, and updating the cheat database required running this program each time. Users were confused as to the motivation behind using a custom file format and didn’t like having to use a command line utility to create it. Loading cheats from a text file seemed like a daunting task at first as I knew it would be quite slow, but I wanted Cheat Device to be straightforward and easy to use. Either I needed to:
- Read the text file in a single pass, allocating game and cheat structures one-but-one.
- Read the text file in 2 passes: the first pass would determine the token-type for each line (game title, cheat title, code line, comment, etc.), then allocate all the games, cheats, and codes at once using single calls to malloc() for each structure type. The second pass would populate each game, cheat, or code line using the token-list to determine the line type.
I decided to use the method described in 2., but it was still very slow. I needed to somehow allocate the structures on demand, but didn’t want to call malloc() thousands of times. Allocating everything at once (as I was doing for loading CDB files as well at the time) would make it very difficult to modify the cheat database on the console. How would I delete a structure if I can’t just free() it? I don’t want to over-complicate things with manual bookkeeping either. So what did I do?
Answer: Object Pools
I decided to replace the calls to malloc() that allocated all the structures at once with two static object pools. Now allocating and deallocating games and cheats is O(1) with minimal overhead for bookkeeping. To delete an object, I push it’s pointer onto a “free list”, and to allocate an object I either take the last entry of the free list or increment a tail pointer. Allocating in this way ended up being thousands of times faster than using malloc to load cheats from a text file in a single pass. This is possible due to using a fixed-size struct for games and cheats.
Once object pools were added in, I could quickly load a text file of cheats in a single pass. Most recently I expanded upon this further by allowing a text file of cheats to be loaded from within a ZIP file, creating an easy way to compress a large, easily maintainable cheat file without relying on a separate program or file format.
Lessons Learned
I learned more from the journey of creating this project than I would have expected! Here’s a few key points:
- Resist early optimizations. I ended up creating a poor, unmaintainable file format based on a false hypothesis (that putting a subset of the strings at the beginning would make it compress faster) to solve problems that could have been better solved in other ways. I’m being a little hard on myself here, but the experience gained from this was invaluable.
- Try to consider future use cases when picking data structures. I figured I could just call malloc() once and fill in a bunch of structs because I didn’t originally plan to allow for editing or saving the cheat database on-console. I ended up having to do a lot of refactoring to make that happen.
- Centralize user documentation. When I first release Cheat Device, I created posts on GameHacking.org, psx-scene, and my website linking to the program and providing documentation within the post itself. This made it a pain when I changed something important, as I would need to manually update the various posts about the project. Now I put virtually all documentation in a wiki hosted on GitHub and can link directly to that rather than repeating information that might eventually become outdated/incorrect across multiple websites.
Final Thoughts
I’m pretty happy with how the project has turned out and the experience I have gain in the process of developing it. I’m not an expert at PS2 development by any means, but I’ve enjoyed getting to know my favorite game console as a kid at a low level. I’ve spent hundreds of hours adding features, fixing bugs, and trying my best to make the code readable and follow best practices. Maybe creating a similar project for Dreamcast, PS1, or another game console would be fun, who knows! Internationalization and support for PSV game saves would be a nice addition too.
You can download the newest version of Cheat Device here: https://github.com/root670/CheatDevicePS2/releases